1. Support
Thank you for choosing Linden WordPress Theme. We have put a lot of effort and love creating it. In this documentation, we have tried to consider all the important details to run your website successfully. In case you have any questions left, please feel free to submit a support ticket here.
Your feedback on our theme is much appreciated. We would love to make our product even better, so please feel free to get in touch with any suggestions for improvement. Thanks again for your support. We value you!
If you like our work, please rate it. If you are going to rate it with less than 5 stars, please let us know the reason first and we will do our best to improve the theme.


2. Theme Installation
After you’ve installed WordPress on your hosting, download the archive with the purchased theme, unzip it and prepare linden.zip and linden-child.zip archives. Open your WordPress dashboard.
Go to Appearance > Themes and click on Upload Theme.
Click on Choose File and select the linden.zip. Click Install Now.
You will see the success message ‘Theme has been installed successfully’, click on the Return to Themes page and do the same for linden-child.zip.
You will see your new linden theme and child theme appear in the dashboard. Press the Activate button on your linden-child theme, you will work with the linden-child theme and do not activate your linden theme.

After activation you will be redirected to the ‘Welcome’ page of the theme. Now you need to install all the plugins used in the theme: click on the Install Theme Plugin button.
Select all plugins in the list, choose Select from the dropdown menu and click on the Apply button. Installation process will begin, it might take a couple of minutes, please wait until it's finished.

Once the installation process is finished, you will see a success message ‘All plugins installed and activated successfully’. Click on the Return to the Dashboard action link.
From your admin panel go to Linden > Demo Install.
You should choose the demo you want to import and use for your theme and click on the Import button.
Demo import can take up to 10 minutes, please wait until it's finished. You will see the success message after the demo is installed successfully.
Select ‘Visit site’ you will see that the demo has been installed.
3. Theme Customization
In your admin panel hover on the home icon and select Visit Site.

On top on the page click on Customize and you will see Customization Panel.

In the Customization Panel you can find settings that will be applied to the entire theme. Once you have applied any changes you have to click on the Publish button to apply those changes.

3.1 Logo
Go to Customize > General. Here you can upload your logo. We suggest uploading a dark and a light version of your logo. The size of our logo is 115px x 28px.

3.2 Favicon
Go to Customize > General. In this section you can upload a site icon that will appear in the browser tab.

3.3 Typography
Go to Customize > Typography. In this section you can change fonts and their settings: size, line height, letter spacing, align. From the Font Family dropdown you can select any Google font you like.

3.4 Main Theme Colors
Go to Customize > Colors. In this section you can change main theme colors.

3.5 Social Media Icons
Go to Customize > Social Icons. In this section you can set links to your social media accounts that appear in the header and footer. You can also edit existing social media icons or add new ones.

3.6 Header Top
Go to Customize > Header Top. In this section you can show/hide header top that appears on top of the page with additional info: address, phone, mail. You can also show/hide Authorization button and Shopping Cart.
3.7 Header
Go to Customize > Header Type. In this section you can change the header of your theme. Just select the option you like more.

In the left side panel you can also choose what element to show on the lift side of your header: whether to show a phone number, button with a link or button to open a popup.

You can choose light or dark theme for your header for each particular page depending on the background you use. On a page click Edit to open the page in the default WordPress editor.

On the bottom of the page you will be able to choose Header Color Scheme and make it dark or light.

3.8 Page Heading
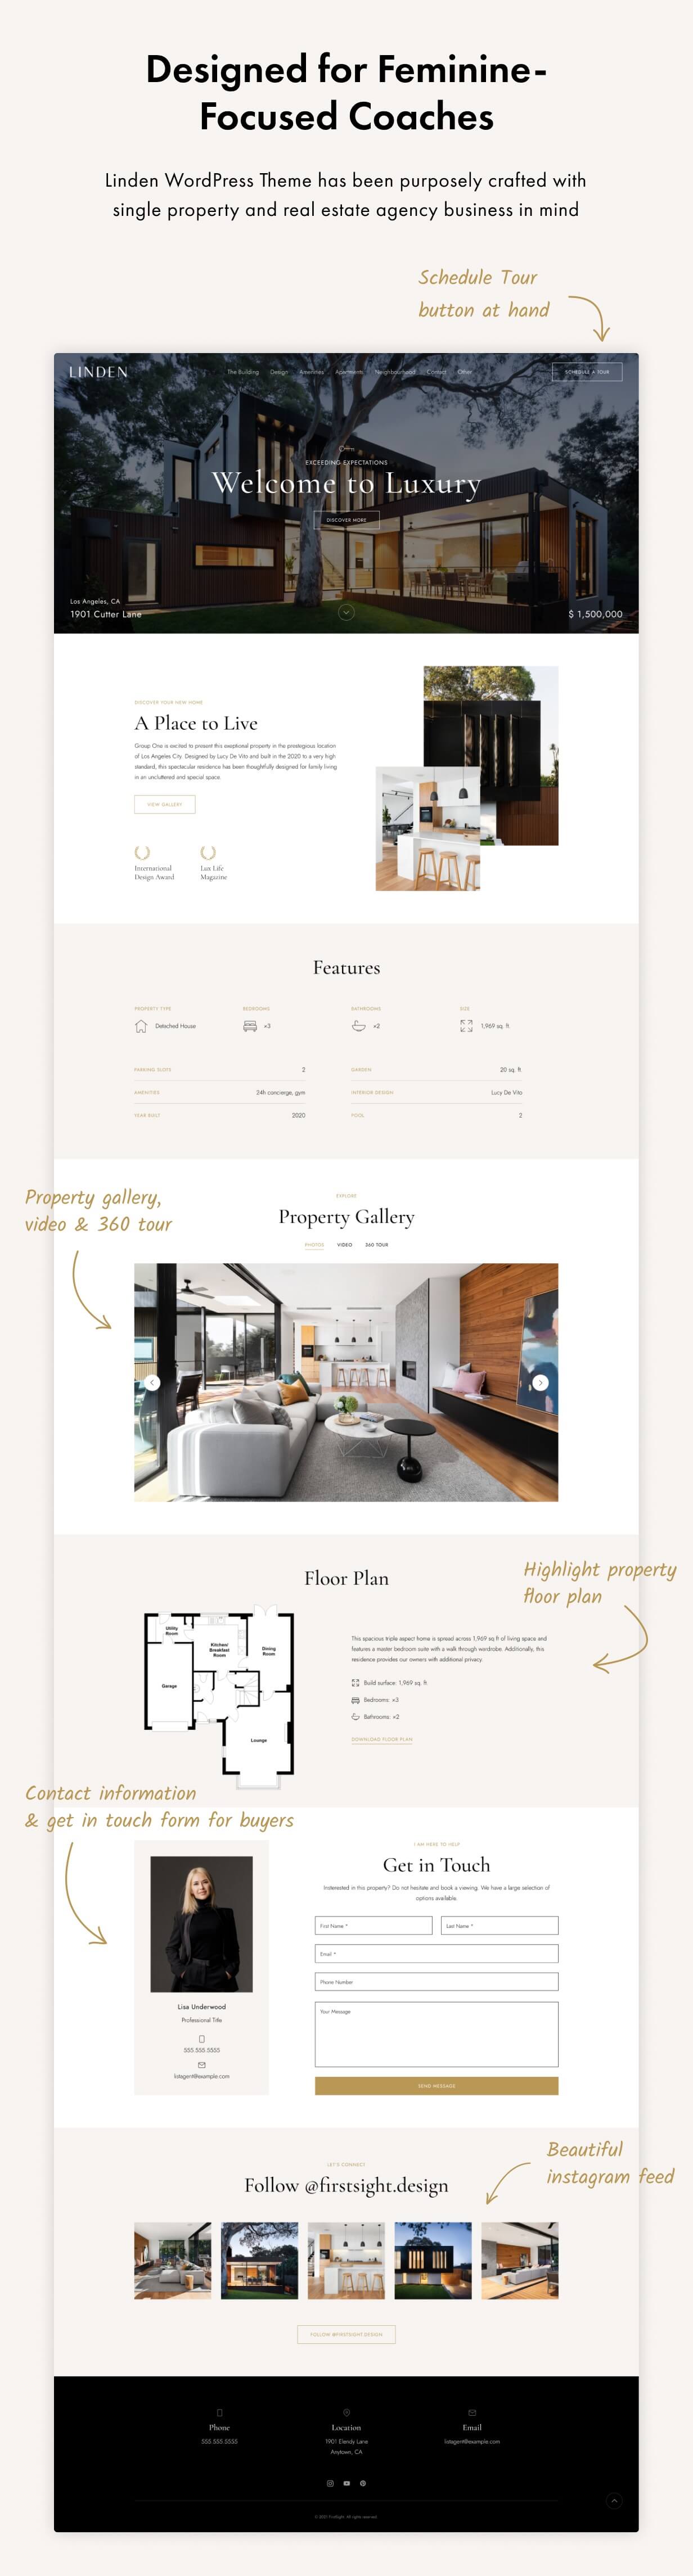
Go to Customize > Page Heading. Almost every inner page has heading part with background color or photo, title and subtitle. This part of the page can be edited here.

To edit title and subtitle you have to open the page you wish to edit in the edit mode.

On the right side of the page you can upload your image and edit subtitle text that appear on top of the page.

3.9 Blog Archive Types
Go to Customize > Blog Archive Type. In this section you can choose the Blog Catalogue page layout. There are two different types, just pick the one you like more.

Default Blog Archive type has a featured post on top of the screen on the colored background.

Typical Blog Archive type has a list layout with sidepanel (optional).

3.10 Footer
Go to Customize > Footer. In this section you can add/edit copyright message that appears in the footer. And you can choose a color scheme for your footer.

3.11 Global Theme Icons
Go to Customize > Global Icons. In this section you can change global theme icons, such as: icon on the Thank You page (after making an order) and empty state of the shopping cart icon.

3.12 Menu Settings
Go to Customize > Menus. In this section you set all the menu items you want to appear in the header of your theme.
In the Main section you can select pages you want to display in the header of your theme.

To change menu items in the header you have to select Menus > Main. You will see the list of pages that are displayed in the header menu of your theme.

To change the label of the menu item or to remove it from the header you have to click on the label, e.g. The Building. To change Navigation Label, simply type in a new name in the field. And to remove the menu item click on the Remove action link.

To reorder menu items you can drag menu items and drop in the location you want it to appear in the header.
To add other pages to the menu, you need to click on the Add Item at the bottom of the list. You will see another panel on the right. Under Pages label there are all the pages you can add to the menu and they will appear in the header of your theme. Press on the page name and it will be added to the left panel and appear in the header of your theme.

You can set up a separate menu for mobile view. Select Menus > Mobile and set it up the same way as Main menu.

For the Second Header Type you need to set up Home 3 Left and Home 3 Right Menus:


3.13 Widgets
To edit widgets available in the footer, go to Customize > Widgets. In this section you can upload the logo that appears in the footer, social media icons, contact information and subscription form.


3.14 Homepage Settings
Go to Customize > Homepage Settings. In this section you can select the page you’d like to be your homepage.

3.15 WooCommerce
Go to Customize > WooCommerce. In this section you can apply some settings to the WooCommerce functionality: add a store notice, change product catalogue settings, product images and checkout.

Go to your admin panel and select WooCommerce > Settings. In this section you can set up your online store: select/change currency, select payment methods and delivery methods, etc.

4. Popup Settings & Shortcodes
To find the shortcode of the popup go to the admin panel of your there. From the left menu choose Contact > Contact Forms. You will see the list of your contact forms and you can copy the shortcode of each popup from this page.

5. Posts
Go to your admin panel and click on Posts > All Posts. Here you will see the list of all blog posts. To add a new post simply click on the Add New button on top of the screen.

You can choose from two types of the Blog Catalogue page, you can find detailed information in the ‘3.10 Blog Catalogue Types’ section of this documentation.
To set up a Sticky post or any other blog post, hover on its name and click on the Edit action link.

For each post you will need to upload a preview image, it will appear on the blog catalogue page.

To make the post sticky, check the box:

After the changes are applied, click on the Update button on the top right corner of the screen to save and apply all changes.
6. Products
Go to your admin panel and click on Products > All Products. Here you will see the list of all products available in the theme shop. To add a new product simply click on the Products > Add New.

To edit an existing product, hover on its name and click on the Edit action link. For each product you should add its name, description, price, you can also add product categories and tags.


Don’t forget to add product image and images to the product gallery, suggested image size is 1000 by 1000px.

7. Pages
Go to your admin panel and click on Pages > All Pages. Here you will see the list of all pages in your theme. To add a new page simply click on the Pages > Add New.
To edit an existing page hover on its name and click on the Edit action link. The majority of the pages are created using Elementor page builder. For such pages you should select Edit with Elementor option.

7.1 Homepage
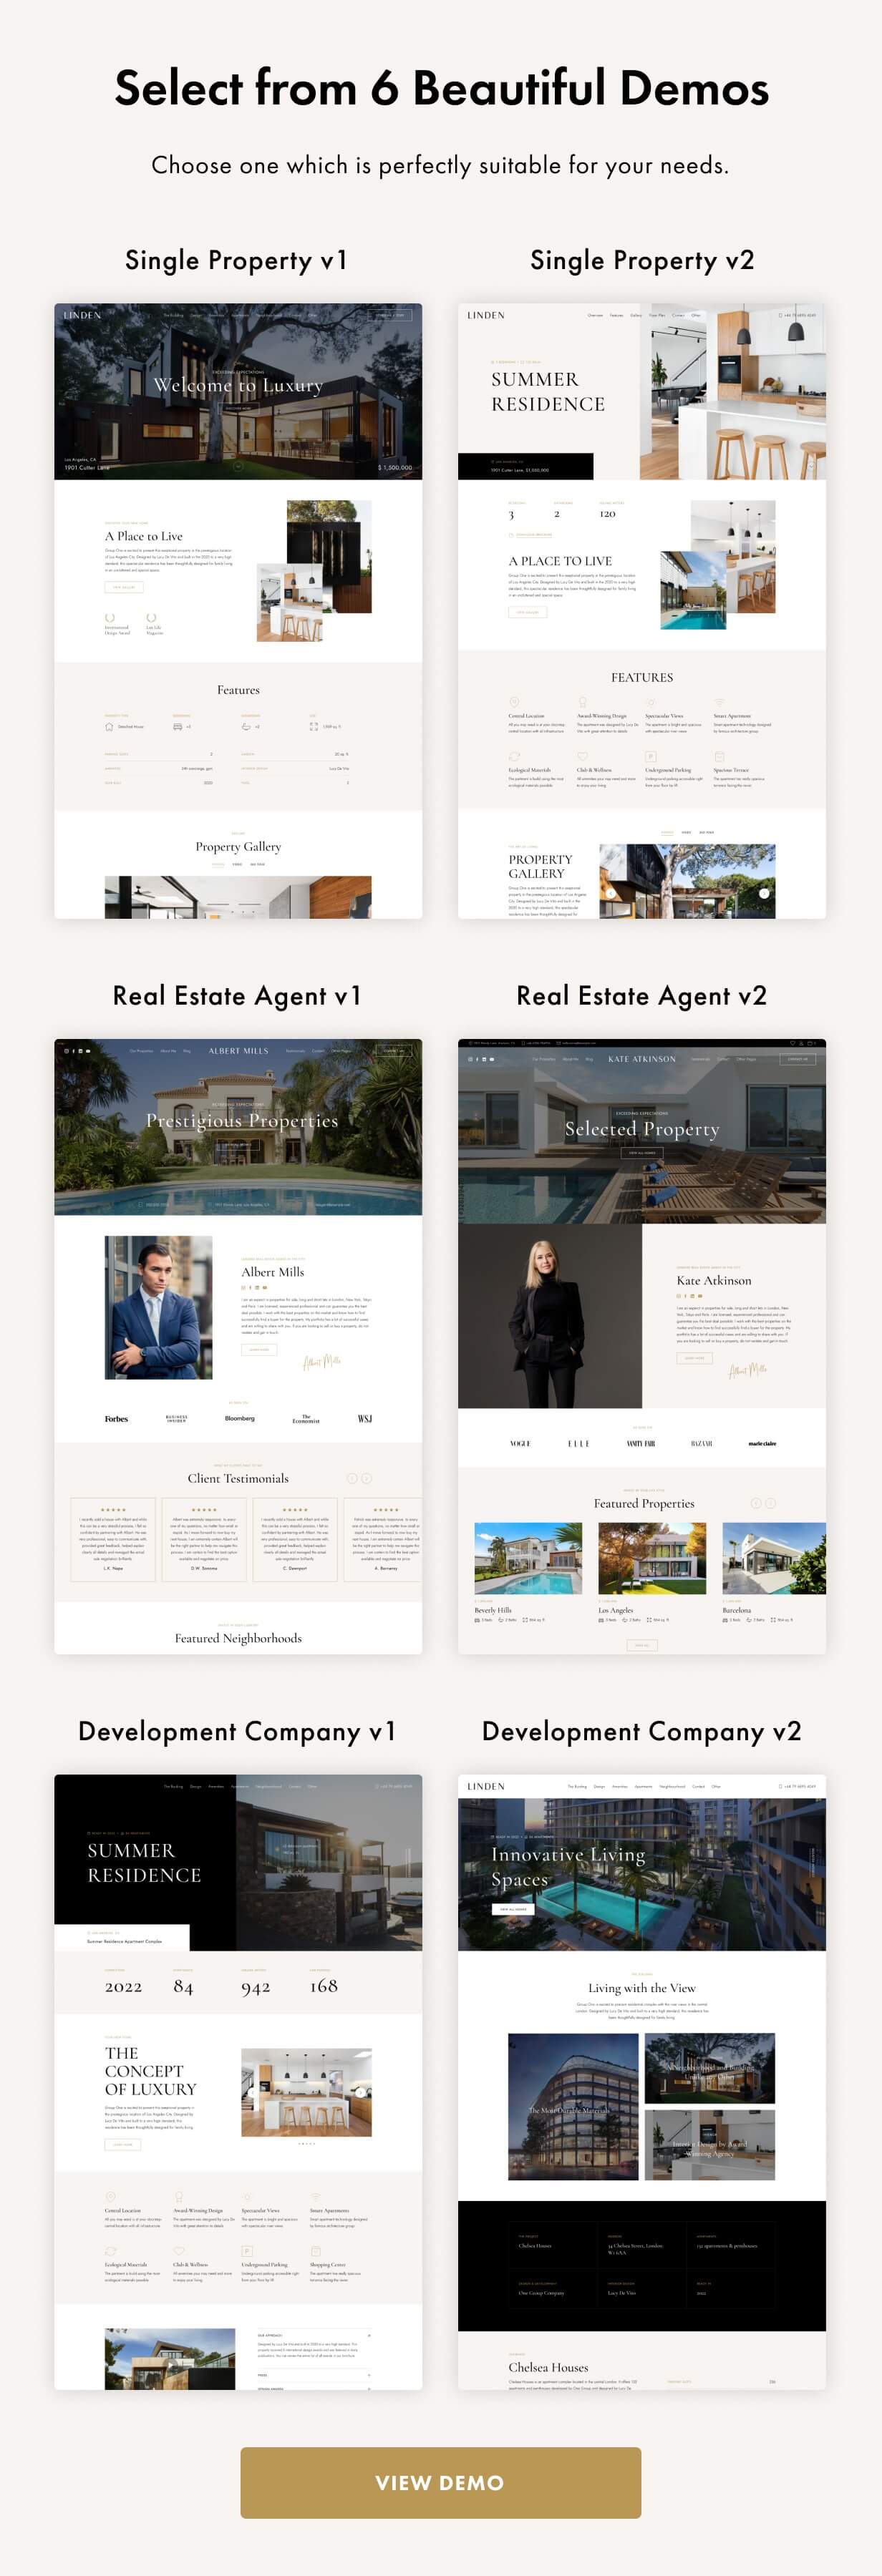
There theme has 6 different options for the homepage.
Homepage 1
To edit the homepage you have to find it in the pages list, hover on it and click on Edit with Elementor. To change the hero image, right click on the hero image and choose Edit Section from the dropdown page.
Select the Style tab in the settings panel on the left of the screen and upload your image to the Choose Image section.

Click on the Select Files button and upload your image. Click on the Insert Media at the bottom of your screen.

After uploading the image or making any other changes, don’t forget to click on the Update button to save the changes.

To edit the Title and Buttons, click on the Edit icon on the correspinding block and make changes in the left side panel.


To edit any other section on the page, hover on it, click on the Edit icon on the left of the section and make changes in the left side panel. Click on the Update button on the bottom of the screen to save the changes.

Homepage 2
To edit the Homepage 2 you have to find it in the pages list, hover on it and click on Edit with Elementor. To change the hero image, right click on the hero image and choose Edit Column from the dropdown page.


To edit other blocks, hover on each, click on the Edit icon and make changes in the leftside panel.

Homepage 3
To edit the Homepage 3 you have to find it in the pages list, hover on it and click on Edit with Elementor. To change the hero slider images, right click on the hero image and choose Edit Section from the dropdown page.


To edit other blocks, hover on each, click on the Edit icon and make changes in the leftside panel.

To edit Featured Neighborhoods block, hover on it, click on the Edit icon and make changes in the leftside panel: change preview image and which neighborhoods to show. Neighborhoods are added in your admin panel: My Apartments > Locations.

To set up apartments shown in the sider, hover on it, click on the Edit icon and make changes in the leftside panel: choose number of posts, order logic, etc. Apartments are added in your admin panel: My Apartments > Add New.

Homepage 4
To edit the Homepage 4 you have to find it in the pages list, hover on it and click on Edit with Elementor. To change the hero slider images, right click on the hero image and choose Edit Section from the dropdown page.


To edit other blocks, hover on each, click on the Edit icon and make changes in the leftside panel.
To edit Featured Properties block, hover on it, click on the Edit icon and make changes in the leftside panel: change title, number of posts and color scheme. Properties are added in your admin panel: My Apartments > Add New.

To set up Areas We Cover block, hover on it, click on the Edit icon and make changes in the leftside panel: choose number of locations to show, order logic, etc. Apartments locations are added in your admin panel: My Apartments > Locations.

Homepage 5
To edit the Homepage 5 you have to find it in the pages list, hover on it and click on Edit with Elementor. To change the hero slider images, right click on the hero image and choose Edit Section from the dropdown page.

To edit hover points on the hero image, hover on the point and make changes in the left sidepanel.

To edit Choose Property block, hover on it, click on the Edit icon and make changes in the leftside panel: change title, number of posts and color scheme. Properties are added in your admin panel: My Apartments > Add New.

To edit other blocks, hover on each, click on the Edit icon and make changes in the leftside panel.
Homepage 6
To edit the Homepage 6 you have to find it in the pages list, hover on it and click on Edit with Elementor. To change the hero slider images, right click on the hero image and choose Edit Section from the dropdown page.

To edit Our Apartments block, hover on it, click on the Edit icon and make changes in the leftside panel: change title, number of posts and color scheme. Properties are added in your admin panel: My Apartments > Add New.

To edit other blocks, hover on each, click on the Edit icon and make changes in the leftside panel.
7.2 The Buidling
To edit the page The Buidling, go to your admin panel and choose My Apartments > All Apartments. To add new apartment, click on the Add new.


To edit existing apartment, click on the Edit with Elemntor action link under the apartments's name and make needed changes in the Elementor edit mode.

To add/edit apartment's types and locations, go to My Apartments > Types / Locations and add new type, ocation or edit existing ones.


7.3 Design
To edit the page Design, open the page, on top of the screen click on the Edit action link. The page will be opened in the default WordPress editor. You can change the title, subtitle and hero image.


To edit the rest of the page, open it and click on the Edit with Elementor action link on top of the page, the page will be opened in the Elementor editor.

To edit the photo grid, hover on the block and click on the edit icon, make changes in the left side panel.

7.4 Amenities
To edit the page Amenities, open the page, on top of the screen click on the Edit action link. The page will be opened in the default WordPress editor. You can change the title, subtitle and hero image.


To edit the rest of the page, open it and click on the Edit with Elementor action link on top of the page, the page will be opened in the Elementor editor.

To edit the background of each block, hover on it and click on the edit section link, go to the Style tab in the left sidepanel and make changes in the Color selector.

7.5 My Apartments
Click on the Edit with Elementor action link on top of the page, here you will be able to set up a grid of your apartments: change the order, choose apartments types to display on the page, change number of posts, etc.

To edit apatments, go to your admin panel and choose My Apartments. To add a new apartment click on the Add New button on top of the page. To edit existing apartments, hover on the name and click on the Edit action link. In the default WordPress editor you can set a name, featured image, add type, address, size, etc.

To edit apatment's details page, go to your admin panel and choose My Apartments. To add a new apartment click on the Add New button on top of the page. To edit existing apartments, hover on the name and click on the Edit action link. In the default WordPress editor you can set a name, featured image, add type, address, size, etc.
Open apartment's details page in the Elementor page editor and make changes to the blocks on the page.

To edit apatments locations, go to your admin panel and choose My Apartments > Locations.

To edit apatments types, go to your admin panel and choose My Apartments > Types.

7.6 Contacts
The are two options for the Contact page you can choose one that works best for you. Click on the Edit with Elementor action link on top of the page to open the page in the Elementor page editor, hover on block you want to edit and click on the edit icon. Make changes in the left sidepanel.
8. Amelia Appointment Booking Plugin
Linden theme is compatible and comes with Amelia: Appointments and Events WordPress Booking Plugin. You can use the full functionality of the plugin with the theme. If you’ve received an alert about a plugin that needs to be updated, this could be because the plugin was recently updated. Unless you have purchased the plugin separately, we will provide the latest version of the plugin with the next theme update.
You can find all information about functionality and documentation of Amelia plugin on wpamelia.com.
Note! If you need a service for installing, configuring, or maintaining Amelia plugin, or access to auto-updates or support, you will need to purchase the license separately, directly from plugin authors website and submit a ticket to Amelia’s support.
Amelia plugin can only be used with the theme it cames with (it cannot be extracted or used with other themes)
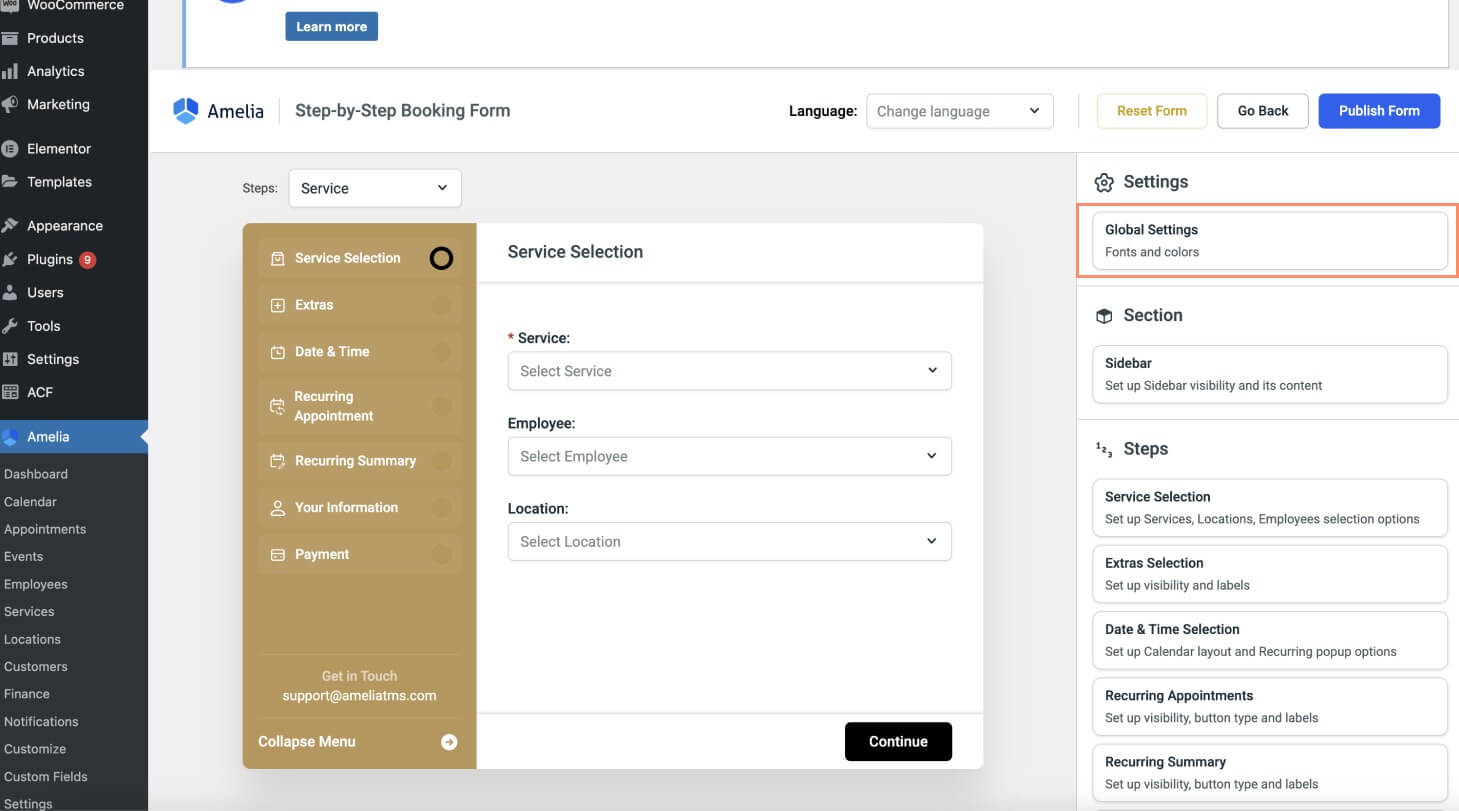
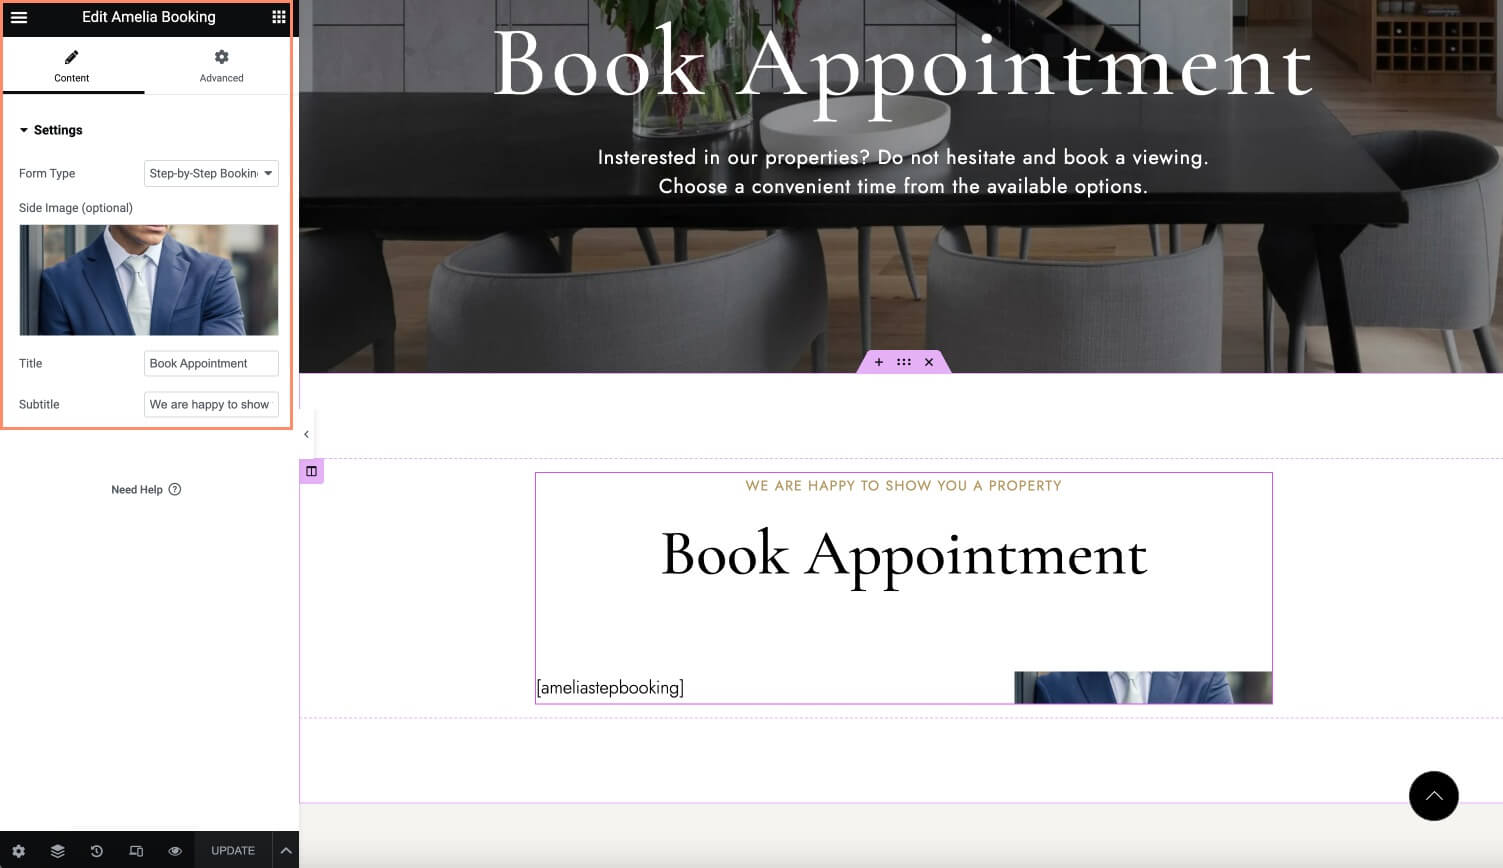
In order to change the settings of the plugin, go to your admin panel and select Amelia. Here you can find all the settings for the Amelia plugin. Learn more about Amelia plugin settings in the documentation.

In order to style your appointment booking widget, go to your admin panel, select Amelia > Customize > Step-by-Step Booking Form and change the colors. If you want to use the same colors as in the demo, follow next. On the right panel in Settings go to Global Settings > Colors.
Primary and state colors Primary Color: rgba(0, 0, 0, 1)
Sidebar Background Color: rgba(185, 151, 85, 100) Text Color: rgba(255, 255, 255, 1)
Calendar Init Cell: rgba(0, 0, 0, 1) Init Cell Text: rgba(0, 0, 0, 1) Cell Selected Background: rgba(0, 0, 0, 1)
Buttons Primary Button Background Color: rgba(0, 0, 0, 1) Primary Button Text Color: rgba(255, 255, 255, 1)
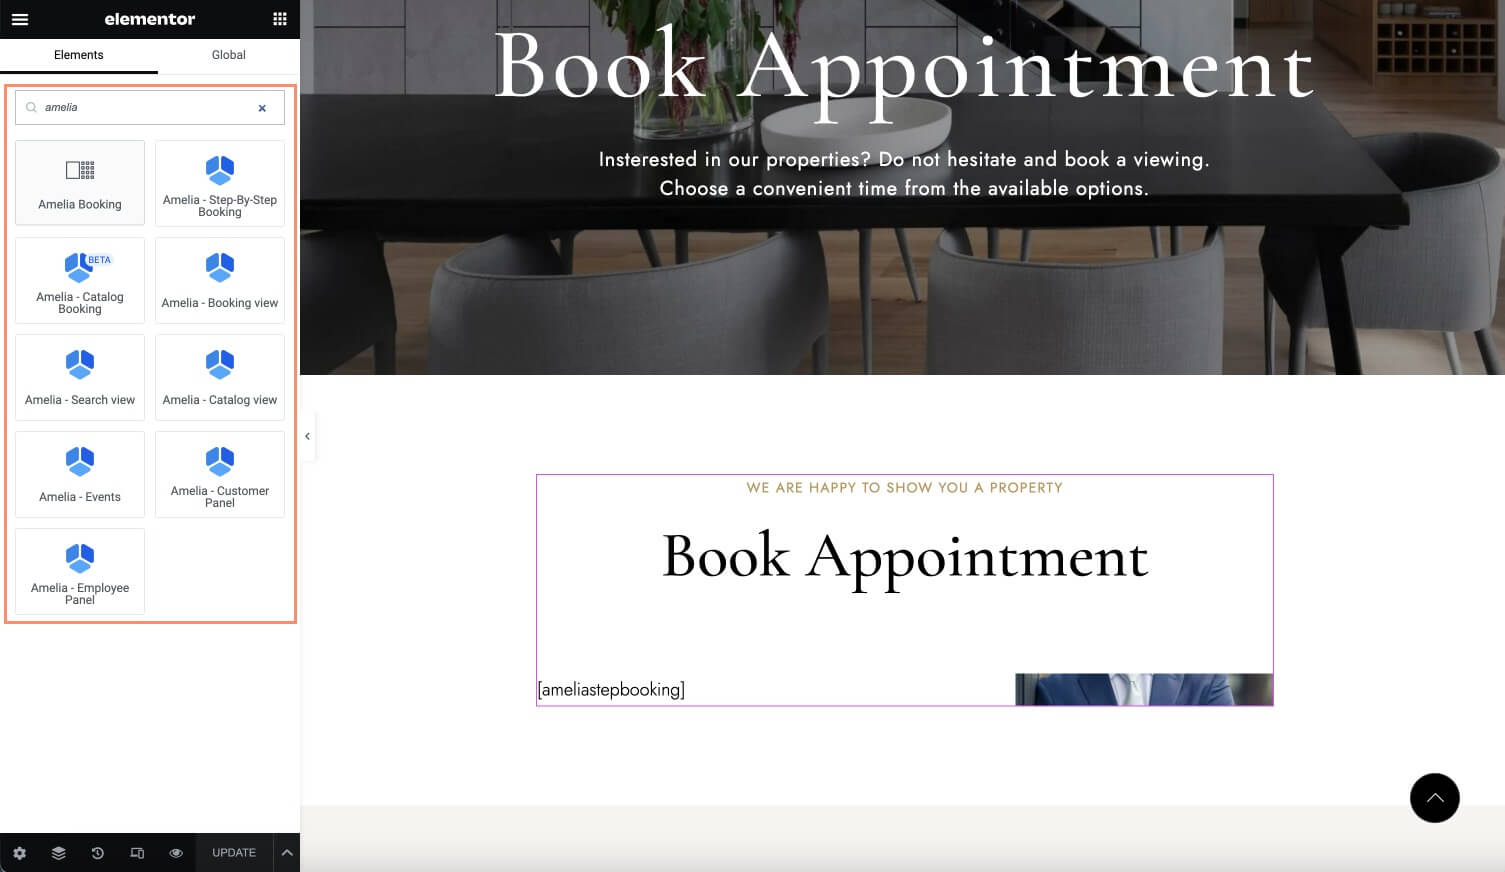
You can add Amelia plugin with our custom Amelia Booking widget for Elementor, or one of default Amelia widgets. Or use a shortcode, learn more about all possible shortcodes at wpamelia.com/amelia-shortcodes.
9. Contact Form 7
For the detailed information about the Contact Form 7 plugin, please read the official guide here.
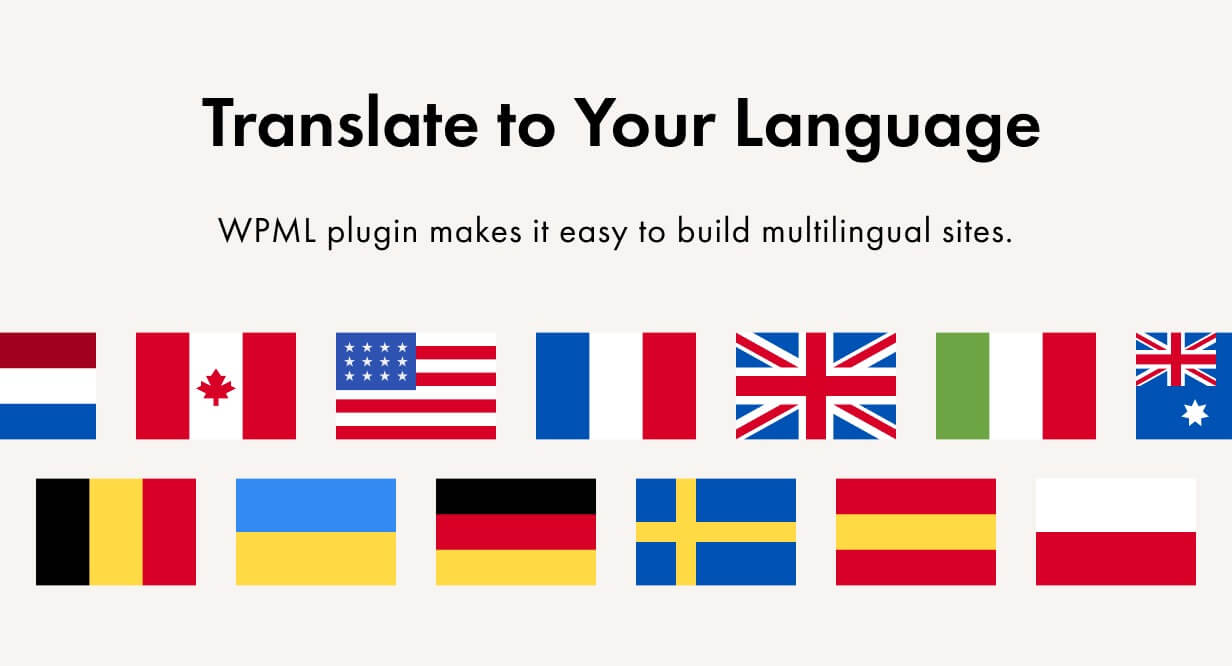
10. Multilingual Settings
11. WordPress
Since WordPress is constantly being updated information about how to install WordPress may become out of date, so you can always read the official guide here.
Here you can find some useful links about the WordPress:
WordPress Codex – general info about WordPress and how to install it on your server.
First Steps With WordPress – general information that covers a wide variety of topics.
FAQ New To WordPress – the most popular FAQ’s regarding WordPress.
12. GDPR
We suggest using Complianz – GDPR/CCPA Cookie Consent plugin. Complianz is a GDPR/CCPA Cookie Consent plugin that supports GDPR, DSGVO, CCPA and PIPEDA with a conditional Cookie Notice and customized Cookie Policy based on the results of the built-in Cookie Scan.
13. Instagram
To connect your instagram account, go to https://www.instagram.com/ and login to the account you want to connect. Go to your admin panel, choose Instagram Feed > All Feeds Click on the Add New.

Choose User Timeline and click Next. Follow the steps shown below:


Disable default header:

Disable default load more button:

Disable default follow button:

Go to Settings > Advanced and enable Custom Templates. Click on the Save button and clear cache. All done!
